1975 AMC Matador NASCAR Stock Car
The story starts out about25 years ago. The father of a girl I was dating at the time, whose name I DO remember, but will not mention here, had a 1975 AMC Matador. Most of the people I knew at the time didn't like ANYTHING from AMC, since, let's be honest here, AMC didn't have a clue about styling or performance. (Aside from the AMX and Javelin from a few years earlier) I personally thought that the Matador in that incarnation was a sweet looking car! Fast Forward to June 2001. While Crystal and I were out on our honeymoon, we happened across a hobby shop in Mt. Pocono, PA. There I found an AMT re-issue of the '75 AMC Matador stock car. I thought, "How cool is this!" and promptly purchased it. Well a few months ago, I started to build the kit and found it to be not a particularly good kit. There were many inaccuracies and design flaws. Also, the supplied decals were only about 40% complete. Of course, the requisite Coke decals were there, but the contingency decals such as Norton, Holley, The Winston Cup decals, and a number of others were also omitted. As usual, I turned to the wonderful folks at the Model Car List for help, and received it in spades! Through them, I found a couple of websites that had reasonably clear reference pics, and also help with finding the missing decals needed to properly finish the kit. Regarding the decals, I had tried to get them from BSR Replicas, who showed on their website an apparently excellent set, and after sending in my order, I had not heard from them in 2 weeks, so I e-mailed them asking about the status, and informing them of the need to change my payment option. I was only then informed that they did not have the decals, and that they didn't think they'd have the paint until June 2002. (What's up with this???!!) Ok, I decided to do it the hard way. I scanned what I could off of various websites, but could not get anything for a few of them. To the rescue comes John, "Oldbugman" to those on the Model Car List. John had all of the rest of the decals I needed, and sent those to me. (Again, Thanks, John!)
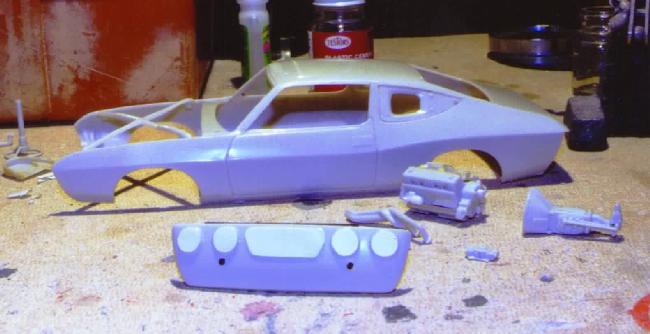
A lot of this kit was built with the what I call the "Drew Hierwarter technique" which is to say, that if some one cant see it on the completed kit, why bother? This is a bit of a departure for me, since I tend to get a little silly on details. The one thing I did get a bit silly on was the engine. I researched the daylights out of it, and did not find much of the facts that I needed to. One example of this is the engine's color. The single photo I found of it was somewhat fuzzy and in black & white. Bob Wilson from Arctic Boy's AMC site helped out with the fact that AMC used a teal blue metallic on their performance engines. Since I had a very similar color on hand, I decided to go with it. I figured, with enough detailing it should be reasonably accurate. So I figure you're sitting there going "WHERE'S THE PICS!" OK, Here's some......
Here's some very early work in progress pics. The rear valence was a piece that I found in the kit, but was apparently intended for a stock version of a '75 Matador. The piece the kit called for was not nearly as true to the 1:1 stocker, so I blanked off the tail light openings, and the license opening. I believe this looks much more like the actual car. On the engine I used a more accurate Holley 4bbl from the parts box, and added a better shift linkage. The headers were slightly modified so that the Detail Master distributor kit's wires would go in the correct places.
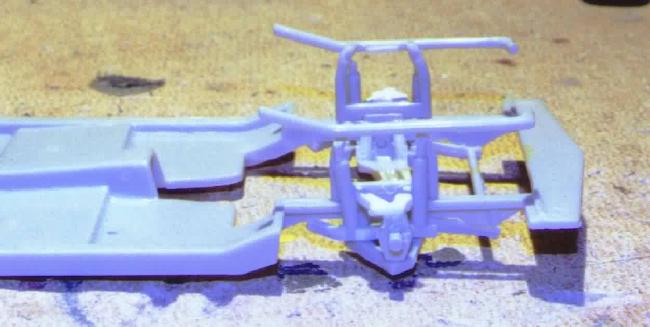
Here's what I was talking about when it comes to design flaws. The kit had a metal axle passing just under the engine's oil pan. I replaced it with the control arms and spindles from a generic Monte Carlo stock car kit, which I believe is way more accurate. The upper arms are cut down pieces from a Corvette.
OK, now some more of the story. Well, there were a few more items to take into consideration. The kit's wheels were not the correct type. They appeared to be taken directly from a later stock car kit since they were 8 slot and ALL of the reference photos I had showed a 5 slot chrome dish type wheel. Not much to do about this one. No-one seemed to know where I might find such an animal. So, I decided to make the best of it, and just use the kit wheels, with a coat of Testors semi-gloss clear on them to knock down the shine a bit, which actually worked well. The tires were kit pieces, with some Shabo dry transfers applied. Some of the other mods I made were also done in response to inaccuracies in the kit. The exhaust dumps were replaced with aluminum tubing which was filled with solder, and bent to route both dumps on the same side. The reference photos I had mostly showed both dumps coming out under the driver side, so that's what I did. On the interior side, the kit's seat was thinned quite a bit, and fitted with a Detail Master seat belt harness kit. I left this in white since the kit's instructions called for this, and also since I did not find anything to tell me it wasn't the case. This and the photos I did have showed a white window net which I also did with a Detail Master piece.
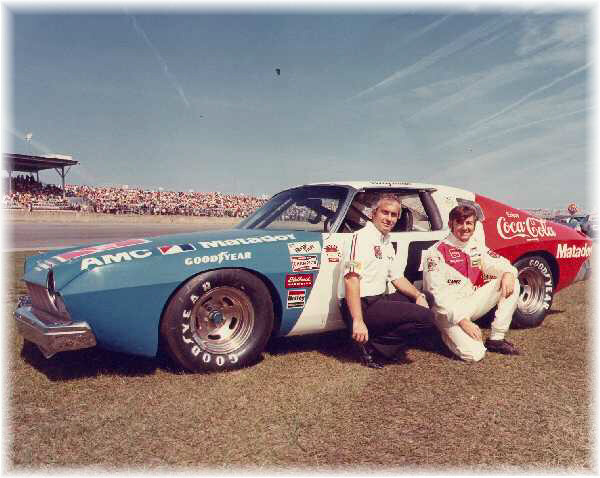
Here's what I mean by this. Note the 5 slot wheels. Also note how dorky Roger looks. (Sorry, I can't help myself sometimes!) It's funny, I used to have a set of those on a car I owned about the same time as this picture was taken, but they were stolen for whatever reason. Hey....... you don't think........NAH!
The paint was another story. After BSR told me their problem (mentioned earlier) I contacted Model Car World. My problem was that I used Testors Racing Colors Valvoline White for the basecoat. MCW said that one of the colors was only available in lacquer, and one only in enamel. BIG PROBLEM! I was not inclined to strip the base since it was a pretty good one. I was in my basement workshop when I remembered some no name blue paint that I remembered to be a reasonably close match sitting somewhere. Turns out it was a Wal-Mart "fast-dry" paint and I wasn't sure if it would work over the cured white base. Luckily, It did work. Very well, if I do say so myself .The Testors Red paint finished off the color scheme. Here's where Mr. Murphy got involved. The red kind of came out a little dull. So, being the modeling "genius" that I am, I decided,"clear it!". Bad Idea. For some reason, the Plasticote clear crazed the red. While I'm sitting there watching it ruin one of my better paint jobs, I also realize that I got the angles on the separation line wrong. OK, I guess I have to strip it and start over again. Break out the 3M safe stripper. Well, after the repaint, I was happy with the results. Unfortunately, Mr Murphy reared his head again, and while I was walking from my paint room to my workbench with my newly repainted masterpiece, I tripped on something (the cat, I think) and fell breaking the body beyond repair. On to the Model Roundup web page to see if one was available. According to the site, a vintage original was available, so I ordered it.
Well, it's now December 19th, and I have the new kit in hand. Somewhat strangely though, the original issue kit is not as well stocked as the reissue. This being the case, I am forced to scrounge some of the pieces from the first attempt, and go from there. One thing I was pleased by, was the fact that the original issue kit had a fairly complete set of decals. It even had and option to do the 12 car ('76 vintage). But, it was not as complete a set as I would have preferred, and the decals John sent to me will still be needed. As I type this the new body is down in my shop waiting for me to come and work on it. Tomorrow, I intend to purchase paint for it (stuff that I am SURE is compatible!).
The date is now January 19th, 2002. the car is done, the pics are scanned, and here they are.
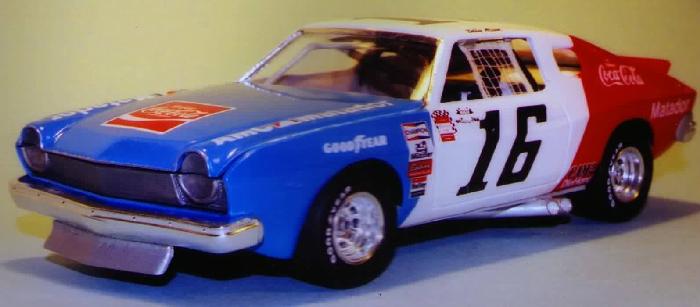
Here you can see the contingency decals supplied to me by OldBugMan. They really helped make the car look more realistic! Also, some work was done on the front fender area in front of the wheel openings. All of the pictures I had showed what appeared to be some more sheet metal added. The kit, however did not have the same contour, so I took care of that, and also opened up the arches to more closely match the 1:1 car.

The rear view. Unfortunately, the rear didn't turn out as well as I would have liked. The decals I had made for the rear panel just didn't look right, so this'll have to do until I can figure out how to make it work.
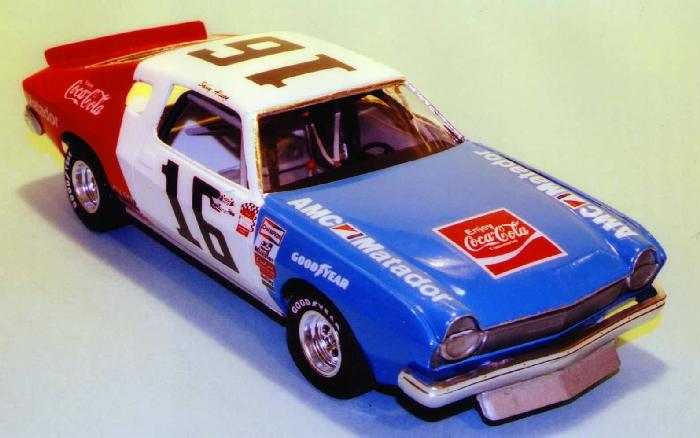
The paint DID, after all the trouble I had, turned out well. I ended up using Plasti-Cote lacquer for the rde and white, and kept the Wally World Blue, since I felt that it was as close as I could find to the 1:1 car's color. The decals were a combination of the kit's stuff, the above-mentioned stuff from John, and some things I produced on the PC.
Well, this was an excercise in patience. I do feel that I've learned a lot from doing this kit, such as never to complain about the engineering on a modern kit, since this one was poorly done at best. The other was, just because the paints are from the same manufacturer, it doesn't mean they won't react adversely to each other. But, the finished model did turn out pretty nice, so I not gonna whine too much.
To those of you who have stuck with me and followed this modeling soap-opera, thank you!
![]() Back to the Paddock
Back to the Paddock